Sambrani uses Sambrani dhoop How to use Sambrani

Sambrani uses Sambrani dhoop
Sambrani dhoop is made from 100% Natural Charcoal Powder, natural herbs and perfumes, and is a soft and slow burning.

Sambrani is a term used by traditional medical science Ayurveda for the yellow resin, a gum like substance that comes from perfumed sap of Sal tree. The sap is extracted from the tree by making an incision in the bark of the tree. This herbal resin is then collected and processed in the form of minute granules that are pressed hard to form crystals or bars of sambrani.

Sambrani is used for multiple purposes like drying the hair of ladies and children, in the temple poojas as incense, as a germicide, as a mosquito repellent, as a sweet fragrance, to create divine atmosphere etc. It is also used as a perfume in the perfume industry, to manufacture incense sticks and cones, as a flavouring substance, and in medicines like Tincture of Benzoin.

The botanical name for sambrani is Benzoin resin. It is produced out of the bark of tree species like Genus Styrax. The main component in the resin is Benzoic acid, generally called Benzoin resin.

Benzoin resin is mainly produced by the countries Cambodia,Thailand, Vietnam, Laos, and Sumatra since Styrax species of trees are grown in these countries. Benzoin gum is also used in the orthodox churches of Russia as church incense. In Arab countries of Middle East and in India, Benzoin is burnt over charcoal fire as incense. It is also used in Japan and China in the manufacture of incense sticks.

The smoky aroma that is generated by roasting the sambrani powder on burning charcoal is therapeutic, antibacterial, and curative. It helps in enhancing sensorial perception and mental clarity. According to Ayurveda and spiritual concepts, it induces serenity, calms the nervous system, revokes negative thoughts, and fosters a quiet mental state. It helps in spiritual practices by enhancing the consciousness and inner awareness.

The amazing uplifting aroma of sambrani is conducive to create soothing ambiance and calm serenity.

The smell of Sambrani amazing and spiritual. It is positive, uplifting, vibrant. Sambrani powder is always sprinkled on glowing red charcoal normally. Now it is available as dhoops also ease of use. The fumes which come out releases an aroma and it slowly spreads all across the room. The fumes cleanses the energy and air in the surroundings and the happiness that gives is beyond explanation. Sambrani is of the best gifts from nature and is rarely known to the world.

The women of India , in the ancient times, used to dry their wet hair with these fumes, after a bath. It would give a scent the hair and also prevent scalp infections.

The Dhoop of sambrani can kill all negative energies and gives ecstasy and an ever expanding mind.

Thanks for Visiting www.womenspage.in

How to make floating rangoli on water

How to make floating rangoli on water
 Items Required are:
a shallow bowl, or a plate. You could also use a shallow tray. (It can be a steel, plastic or a glass bowl).
a couple of spoons of oil or ghee (clarified butter).
white rice powder, or white distemper powder.
colors of your usual rangoli powder/dye to use for coloring your rangoli.
water to fill up your bowl or your plate.
Method:
Plan on a design to make as your "rangoli on water".
Choose a place (could be a tabletop or an altar) to display your "rangoli on water".
Take your time to decide upon a place for this, because once you're done with this project, you wouldn't be able to move your "rangoli" without disturbing it.
Any shifting to the arrangement of the bowl with the "rangoli on water" once the rangoli is made, could ruin your design.
You could use a glass or a steel bowl, tray or even a 2" to 3" deep plate as a canvas for the rangoli.
Place your bowl/plate in your chosen space, and apply oil or ghee (clarified butter) to the inside surface of the bowl/plate.
Pour some cold water into the bowl, filling it all the way to the edges of the bowl.
Sprinkle fine rice powder or white distemper powder on the surface of the water in the bowl.
Draw your planned rangoli design on the surface of the water and fill in the colors as required.


How to make floating rangoli on water
Thanks for Visiting www.womenspage.in

Toli Ekadasi (తొలి ఏకాదశి) Festivals of India

Toli Ekadasi (తొలి ఏకాదశి)-Festivals of India

Toli Ekadasi (తొలి ఏకాదశి)is considered as the first festival of Andhra Pradesh(Telugu people).Ekadasi is also known as Deva Sahayani Ekadasi or Hari Sayani Ekadasi and the Chatur Mas Vrat (Four Holy Months in Hinduism) begins from the day.The night time of Devas begins on this day and is believed that Lord Vihnu goes to sleep from the day.


Toli Ekadashi Wednesday, 1 July
Shayani Ekadashi 2020

Ekadashi list :

Ekadashi dates in 2020

January 6, 2020, Monday
Pausha Putrada Ekadashi
Vaikuntha Ekadashi
Pausha, Shukla Ekadashi
Begins – 03:06, Jan 06
Ends – 04:02, Jan 07

January 20, 2020, Monday
Shattila Ekadashi
Magha, Krishna Ekadashi
Begins – 02:51, Jan 20
Ends – 02:05, Jan 21

February 5, 2020, Wednesday
Jaya Ekadashi
Magha, Shukla Ekadashi
Begins – 21:49, Feb 04
Ends – 21:30, Feb 05

February 19, 2020, Wednesday
Vijaya Ekadashi
Phalguna, Krishna Ekadashi
Begins – 14:32, Feb 18
Ends – 15:02, Feb 19

March 6, 2020, Friday
Amalaki Ekadashi
Phalguna, Shukla Ekadashi
Begins – 13:18, Mar 05
Ends – 11:47, Mar 06

March 19, 2020, Thursday
Papmochani Ekadashi
Chaitra, Krishna Ekadashi
Begins – 04:26, Mar 19
Ends – 05:59, Mar 20

March 20, 2020, Friday
Vaishnava Papmochani Ekadashi
Chaitra, Krishna Ekadashi
Begins – 04:26, Mar 19
Ends – 05:59, Mar 20

April 4, 2020, Saturday
Kamada Ekadashi
Chaitra, Shukla Ekadashi
Begins – 00:58, Apr 04
Ends – 22:30, Apr 04

April 18, 2020, Saturday
Varuthini Ekadashi
Vaishakha, Krishna Ekadashi
Begins – 20:03, Apr 17
Ends – 22:17, Apr 18

May 3, 2020, Sunday
Mohini Ekadashi
Vaishakha, Shukla Ekadashi
Begins – 09:09, May 03
Ends – 06:12, May 04

May 4, 2020, Monday
Gauna Mohini Ekadashi
Vaishnava Mohini Ekadashi
Vaishakha, Shukla Ekadashi
Begins – 09:09, May 03
Ends – 06:12, May 04

May 18, 2020, Monday
Apara Ekadashi
Jyeshtha, Krishna Ekadashi
Begins – 12:42, May 17
Ends – 15:08, May 18

June 2, 2020, Tuesday
Nirjala Ekadashi
Jyeshtha, Shukla Ekadashi
Begins – 14:57, Jun 01
Ends – 12:04, Jun 02

June 17, 2020, Wednesday
Yogini Ekadashi
Ashadha, Krishna Ekadashi
Begins – 05:40, Jun 16
Ends – 07:50, Jun 17

July 1, 2020, Wednesday
Devshayani Ekadashi
Ashadha, Shukla Ekadashi
Begins – 19:49, Jun 30
Ends – 17:29, Jul 01

July 16, 2020, Thursday
Kamika Ekadashi
Shravana, Krishna Ekadashi
Begins – 22:19, Jul 15
Ends – 23:44, Jul 16

July 30, 2020, Thursday
Shravana Putrada Ekadashi
Shravana, Shukla Ekadashi
Begins – 01:16, Jul 30
Ends – 23:49, Jul 30

August 15, 2020, Saturday
Aja Ekadashi
Bhadrapada, Krishna Ekadashi
Begins – 14:01, Aug 14
Ends – 14:20, Aug 15

August 29, 2020, Saturday
Parsva Ekadashi
Bhadrapada, Shukla Ekadashi
Begins – 08:38, Aug 28
Ends – 08:17, Aug 29

September 13, 2020, Sunday
Indira Ekadashi
Ashwina, Krishna Ekadashi
Begins – 04:13, Sep 13
Ends – 03:16, Sep 14

September 27, 2020, Sunday
Padmini Ekadashi
Ashwina, Shukla Ekadashi
Begins – 18:59, Sep 26
Ends – 19:46, Sep 27

October 13, 2020, Tuesday
Parama Ekadashi
Kartika, Krishna Ekadashi
Begins – 16:38, Oct 12
Ends – 14:35, Oct 13

October 27, 2020, Tuesday
Papankusha Ekadashi
Ashwina, Shukla Ekadashi
Begins – 09:00, Oct 26
Ends – 10:46, Oct 27

November 11, 2020, Wednesday
Rama Ekadashi
Kartika, Krishna Ekadashi
Begins – 03:22, Nov 11
Ends – 00:40, Nov 12

November 25, 2020, Wednesday
Devutthana Ekadashi
Kartika, Shukla Ekadashi
Begins – 02:42, Nov 25
Ends – 05:10, Nov 26

November 26, 2020, Thursday
Vaishnava Devutthana Ekadashi
Guruvayur Ekadashi
Kartika, Shukla Ekadashi
Begins – 02:42, Nov 25
Ends – 05:10, Nov 26

December 11, 2020, Friday
Utpanna Ekadashi
Margashirsha, Krishna Ekadashi
Begins – 12:51, Dec 10
Ends – 10:04, Dec 11

December 25, 2020, Friday
Mokshada Ekadashi
Vaikuntha Ekadashi
Margashirsha, Shukla Ekadashi
Begins – 23:17, Dec 24
Ends – 01:54, Dec 26

Vaishnava Mokshada Ekadashi:

Tholi Ekadashi is the eleventh day of Shukla Paksham (waxing phase of the moon) of Ashada Masam - the Telugu calendar month called Ashadam. The day is observed with great reverence all over the country by different names: Devashayani Ekadasi, Hari Sayani Ekadasi, Shayana Ekadasi, Maha Ekadashi, Toli Ekadasi and Vishnu Sayani Ekadashi. Lord Vishnu is said to go into Yoganidra (meditation / sleep) after this Ekadahsi, for four months. These four months are night time for all Devathas – Gods. This period of four months is called Chaturmasya and the ardent devotees who observe Chaturmasya vratham are expected to minimize the quantity of sense gratification and spend their time in spiritual lore. Most restrictions in these four months are on intake of food, in Shravana masam (name of month) one should not eat spinach, in Bhadrapada masam one should avoid yogurt, in Ashwija masam it is milk and in Karthika masam it is non-vegetarian and high protein food like pulses.

Toli Ekadasi is regarded as a very sacred day to Farmers.This festivals replicates Eruvaka festival that is celebrated by farmers.Farmers sow seeds after the first rain on the day of Toli Ekadasi.This festival is marked with pooja of all agricultural implements.As this is a sacred festival for farmers,people who want to get into farming are imposed on this day.

The farmers fast on this sacred day to pay their homage and break the fast at the dawn commensing with a pooja and eat fruits after the fast.It is believed that by praying on Toli Ekadasi will help a person from redumption if sins.

Shri Vishnu Sahasra nama stothram calls HIM Ekasmai Namaha meaning salutations to the ONE. So in the very name of Ekadhasi Shri Hari is present and so it is a very auspicious day. Since Shri Hari is the presiding deity for Ekaadashi, it is also called 'Haridina' meaning a day to be dedicated entirely for worshipping Him, meditating upon Him, listening to His glory and studying the scriptures. Sri Purandara Dasaru says vrathagalellavu hardina vrathadahinde. This is a unique concept of the followers of Dvaita philosophy.

Observance of Ekadashi by fasting & meditating on the Divinity with implicit faith, is an excellent reflection of sathva guna. The Lord mentions in the Gita that none born of prakruthi is free from the influence of three gunas, viz, Sathva, Rajas & Thamas. Of the three gunas, sathva is given the highest place because the jeeva in whom sathva guna dominates moves towards the Nivruthi marga i.e., Jnana-Bhakthi-Vairagya-Moksha. To such souls, God reveals Himself. Ekadashi observance cleanses the mind and amp; paves the way for Jnana. It is an established fact that when one does not take food even though there is a desire for it, there will be increase in self-control & it develops a strong will power. One who controls hunger will be away from sin because hunger is the root cause of many a sins. Srimad Acharya says in krishNAmrutha mahArNava that the fire of merit that accrues from observing an Ekadhasi reduces to ashes the sins of hundreds of births.
Ekadasi puranam pooja vidhanam
Lord krishna in bhagavath geetha says Those who do ekadasi fasting are v.dear and near to him, similarly we all know the story of ambarishi , such is the power of ekadasi.so attempted to detail the procedure and rules to fast, Also from ekadasi purana the katha shravanam for each ekadasi for all of you to benefit. Hope you will enjoy and also get the blessing of sri narayana.Even if not fasting just reading corresponding stories of each ekadasi will give salvation .

Just as both white and Black cow give the same quality of milk, the ekaadasis in both the dark and bright fortnight are equal in their potency to confer merit, and to liberate one from the endless cycles of misery.

SIGNIFICANCE OF FASTING:
The moon is not in its full glory during Ekadashi due to its movement. The food that is, therefore, consumed on these days remain undigested. Moon is the solicitation deity for food. Upavasa does not mean mere fasting, it means sAmepya vesa (dwelling in proximity to the Lord) with archana, japa, katha shravana, nirAhara and jAgarna. So, after setting apart sometime to basic necessities the whole day and amp; night is to be spent in thinking about His glories. Even if Shraadha falls on this day, it is to be performed on the Dwadasi day only.

Varaha purana says the pregnant woman, mothers of young children and amp; those who are very weak can partake fruits like dates, banana, grapes, coconut milk, milk, curds.All sins indulged in by the body and mind are wiped out by Upavasa.
Note:
Ekaadasi fast is exempted for those who are ailing, for the aged persons, and for ladies who are pregnant. This is in agreement with accepted dharma shastraic doctrines. Those who cannot observe a full fast may observe it to the extent possible - like fasting by drinking milk, fruit juices, etc. Even those who are exempted the full fast due to physical conditions must avoid onion, garlic, and other spicy foods that are ritually impure on ekaadasi days. Ekaadasi is the king among the Fasts, and one should be regulated in food habits (even if physical condition does not permit total abstinence from food and water). Please remember this important point and observe the fast in the way that is possible for you according to your circumstances.

Ekadhashi is a fasting day to atone for our sins of indulging in undesirable acts through Dashendriyas. It is a Vaishnava Vratha which is greater than all Yaagas & its power to destroy sins is unmatched if we follow the dos and don'ts of it strictly.
  • Worship, meditate & think about Him. 
  • Keep awake during the night of Ekadhashi. 
  • Make a sankalpa for three day vow. 
  • Break the fast on the Dwadasi day as per rules. 
  • On Ekaadashi, take theertha only once no thulasi to be eaten & have only angaara mark(Black mark) on the forehead. 
  • Tell the greatness of Ekaadashi to others. 
  • Perform Ekaadashi shraadha on Dvadashi day. 
  • If shraadha falls on sadhana dwadaashi day, serve food to the brahmins before Dvadashi passes off. 
  • Even on vridhi, suthaka days, ekadhashi is to be observed. 
  • Even while in their periods, women have to observe Ekadashi. 
  • No food, water or sleep. 
  • No sleep during day time on Dasami, Ekadashi & Dvadashi. 
  • The first part of Dvadashi thithi is called Harivaasara & no food to be taken during that period. 
  • No cooked food to be offered as Naivedya on Ekadashi. 
  • No Ramaa (Lakshmi) naivedhya.
SANKALPA MANTHRAS:
dashamee divase parapte vrathastoham janaardana
thridinam devadevesha nirvigham kuru keshava (Brahmavaivartha puraanam)


Janaardhana! Today being Dasami, I am ready for the three day vow. Oh, Lord! Deva Deva! Keshava! ss that no obstacles come in the way of my vow.
ekaadashyam niraharaha sthithvahani parehyaham
bhookshyaami pundareekaaksha saranam me bhavaachyutha
(Brihannaaradeeya puraanama)


After fasting on Ekadhashi, I will eat on Dwadaashi, Please be my refuge, Oh, Achyutha!
adhyashvasheha niraahaaro bhoothvaaham dwaadashee dine
vidhaasye paaranam dheva preetho bhava ma maanisham (Varaaha puraanam)


I will be on a fast tonight and tomorrow and break the fast on Dwaadashi. Lord! may you be pleased.
 
ajnaana thimiraandhasya vratenaanena keshava
Praseeda sumukho natha jnaanadristi prado bhava
(Brihannaradeeya puraanam)

Oh Lord! Keshava! I am blinded by the darkness of ignorance. By my undertaking this fast on Ekadashi, may it please you to bless me with the light of knowledge.
ekaadasyupavaasena dwaadashee paaranenacha
yadaarijitham mayaa punyam thena preenathu keshavah
(Brahmavaivartha Puraanam)


May Lord Keshava be pleased with the merit that accrued to me by fasting on Ekaadashi & breaking the fast on Dwaadashi.
na kashi na gaya ganga na rewa cha gowthamI
na chapi kauravam kshathram, thulyambhoopa haredrinaath
(Padma puranam)

That sacred rivers like Ganga, Narmada, Godavari etc & holy places like Kashi, Gaya, Kurushetra etc., cannot equal the merit of Ekaadhashi vratha.

bhagavatharodagodi upavasa jagara ondhina madalilla
ragadhi shukamuni peldha harikaThesuyogavembodhilla

Thanks for Visiting www.womenspage.in

How to use Microwave Oven How to use LG Microwave Oven

How to use Microwave Oven

Read the instructions and safety warnings thoroughly. here's a lot of stuff you need to know in that little booklet.
Plug your microwave in. Don't plug too many appliances in at once, or you may cause a power outage.
Set the time that you want to microwave something for.
  • If your microwave has a dial, turn it clockwise until the screen displays the desired time.
  • If your microwave has a number pad, type in the desired number of minutes followed by the desired number of seconds.
  • You may have to press "Cook" on your microwave before the time set will activate the microwave.
Apply your understanding to microwave specific items.

  • Start with Bake a Potato in the Microwave. If you are baking just one or two potatoes, or a sweet potato, reduce the power so the outside doesn't scorch by the time the inside is done.
  • Warm a plate of leftovers at low power.
  • Warm a milky coffee at medium power and check carefully when to stop so the milk retains its goodness.
  • Make s'mores in a microwave for a graphic demonstration of a microwave's power of cooking food through all at once: the marshmallow rapidly becomes extremely large.
  • Cook something big (but not huge, leave plenty of space on the sides, and stack loosely so some microwaves can enter into the core of the pile) at full power. For instance, a few pounds of potatoes to be mashed, piled all together plastic wrap or washed and returned to a plastic bag they came in, at full power. (Try fifteen minutes on high for five pounds.)
  • Microwave chopped-to-size vegetables before frying them to get the inside somewhat soft without having to burn the outside.
  • Make Microwave Popcorn, whether in a ready-made bag or in a covered bowl with a little oil (look around for a recipe). You might not expect from the rest of this article that it would work well, but it does. Follow the directions carefully; stop microwaving sooner rather than later -- it's better to have a mostly-full good bag rather than a full scorchy bag. This generally should be done on full power to make steam to pop the little kernels rather than slowly fizzling the moisture out of them. Try elevating the bag off the microwave floor for more even cooking if you get a lot of uncooked kernels alongside some burnt popcorn.
Understanding Your Microwave
Understand how a microwave oven heats food.

Microwaves penetrate and generate heat at depth within water-bearing food. In contrast, almost all other cooking methods heat the surface only, whether by conduction as in cooking with a fluid such as hot air (roasting), steam (steaming), oil (frying), or water (boiling), or non-penetrating radiation as in broiling. (Convection is merely bulk flow facilitating conduction).
  •  Microwaves do not cook from the "inside out", but do cook thin food essentially all throughout at once, and reduce the depth within thick food to which conduction from the rest of the food must carry heat.
  • Unlike boiling, etc. there is no hot dense fluid to carry heat to the interior of a large pile of food. Don't overstuff the microwave oven, even with somewhat loose items such as a big stack of potatoes.
A microwave generally cannot cook food that does not contain much water, including something that is light and fluffy, well.
  • Don't microwave something that contains little water for more than a minute or so before the microwave has a few minutes to rest, and put a cup of water in the microwave (which will get hot) with it to absorb the otherwise unused microwaves. This will help keep the microwave from overheating and damaging itself with surplus microwaves.
  • Generally, don't expect something that is supposed to dry out in the cooking process, such as a cake, to turn out well unless you use a special microwave-adapted recipe.
Microwaves tend to have many hot and cold spots from "standing waves". A turntable reduces this problem by moving the food through hot and cold spots. Very thin, flat solid food cannot conduct heat through itself rapidly to the cold spots. In some microwaves small or thin items cook better if they are supported above the floor by, for instance, an inverted bowl under a plate.
Understand how heat flows through food

A cooking method heats only the outside of a food item or in a microwave, the outer layers, perhaps an inch, enough to cook a two-inch-wide chunk more or less all at once. The heat must flow through the food to cook the rest.
In a microwave, heat must also flow from better-heated to worse-heated spots.
Water-based food most food, and the only kind that microwaves can cook cannot get hotter than 212 degrees Fahrenheit (100 degrees centigrade) until all of the water in the spot being heated has been boiled away. Applying more heat than sufficient to keep the outside from cooling below that point does not increase the rate at which heat flows into the interior to enable the cooking reactions (and to a very small extent, perhaps, be absorbed by them) by conduction through the watery bulk of the food. It only dries out the outside faster.
You may be familiar with this principle through cooking a steak. One should use high heat only to scorch the surface, then low heat to cook the interior to the desired level of overall doneness without ruining the exterior.
Pressure cookers keep water from boiling until it reaches a higher temperature, and, so, also cook extremely fast. But they are more or less limited to boiling (or, in the case of specialized commercial pressure-fryers for frying chicken, deep frying).
Sometimes it is desirable to cook the food at an even lower heat, to allow the interior to reach the desired temperature and sit at it for a certain period without the outside having to get much warmer. This takes longer because there is a smaller temperature gradient to drive heat flow, but, even with the longer cooking time, can keep the reactions that would overcook the outside at near-boiling temperatures to a minimum.
Consider sous vide. Try showing off with something "sous microwave", then seared, but start simple perhaps by poaching an egg in plastic wrap and be extra careful that anything involving raw meat or otherwise potentially hazardous is cooked through to a temperature sufficient to kill anything in it. Use a meat thermometer at several points. (There is little risk of something new bad developing in food during a microwaving process itself, because that is pretty fast.)
It is very important not to overheat something containing milk, such as hot chocolate, even to boiling because the milk can irreparably separate.
Watery foods, such as watery soups, can cook well at higher heat levels because they carry heat through themselves by convection. (Thick soups will not convect and will instead bubble locally and spit under excessive microwaving power.)
Consequently, turn down the power if microwaving just a few items of food so the outside and hot spots are not overdone by the time the rest is done. Generally, use half power if heating something other than at least a large mugful of watery liquid or a heap of food a few inches high at least; even less--"defrost" setting or one-quarter power for something already cooked and at risk of overcooking such as reheating chicken.
If you have been scorching the outside of items before cooking the inside, just reduce the power at first--you don't necessarily have to increase the cooking time. Remember, the overly-high heat wasn't cooking the food faster, just drying it out.

Understand the side-effects of other cooking methods, and choose to include them if you like.
  • Some cooking methods, such as frying, smoking, or boiling with salt or spices, also add material and thus flavor to the food. Microwaving doesn't add anything, so add all the flavoring (including "liquid smoke", smoke particles collected in a very efficient manner and dissolved in liquid) you like to the food before or after cooking. Add conservatively: only a very small fraction of the medium in which something would otherwise be cooked is actually absorbed into the food.
  • Some cooking methods add water to the food. Some, such as boiling (with water to be discarded) add way too much, so that it leaches out vitamins. Generally all that is needed with items prone to drying out is some plastic wrap with a few holes to prevent pressure buildup, but if something is on the edge of overdrying, add just a little water and cover it.
  • Some cooking methods dry out the outside of the food. Microwaving will liberate steam and re-moisten it, so if a crispy outside is desirable, generally microwave to get the inside mostly done, then cook the outside.
How to use LG Microwave Oven


Microwave Oven Types Microwave Oven Buying Guide Microwave Oven Parts and Functions
AP EAMCET 2014 Results on apeamcet.org Honey varieties Types of Honey Honey from the flowers of Neem Honey 300 Types of honey
Nokia 225 feature phone specifications and features
Thanks for Visiting www.womenspage.in

Microwave Oven Types Microwave Oven Buying Guide Microwave Oven Parts and Functions

Microwave Oven Types Microwave Oven Buying Guide

Introduction

Microwave oven initially gained popularity for reheating frozen foods. But now, it has evolved to become one of the most important kitchen appliances that can cook a variety of dishes within minutes. The new-age microwave ovens feature many auto-cook settings so that even a first time user can operate those efficiently. As you get along with your microwave, you will see that a large number of delicacies can be conveniently prepared with this device, saving both time and effort.

This buying guide will familiarize you with the general features of microwave ovens; categorize them as per their overall design and targeted end-users, thus helping you to choose the right oven to meet your requirements. You will also get to know about a few indispensable accessories that you should buy along with a microwave.

Who is this buying guide written for?
  • Those who want to prepare food fast and fuss-free
  • Those needing to reheat food on a regular basis
  • Working parents as well as singletons
What is a microwave oven?
A microwave oven is an electrical kitchen appliance that can heat or reheat food items instantly without employing any heating element or fire. New-age microwaves have features and functions to cook, grill and bake a variety of dishes easily.

Microwave ovens work using a high frequency radio wave of about 2.45GHz, which vibrates the water and other liquid molecules within any food item. These liquid molecules are vibrated at such a speed (unnoticeable with naked eyes) that it generates tremendous heat. The generated heat cooks the food within a very short span of time.

Microwave Oven Types

Convection type
Grill typeOven (solo) type

Convection type:

Any convection type microwave oven features a fan and a heating element to create air flow patterns inside the oven. The continuous hot air flow ensures optimum browning of the food evenly from all sides. Convection modes are suitable for baking and can be used to make food crispier from both inside and outside.
  • Features a fan with a heating element to create air flow inside the oven
  • Circulated air browns food evenly from all sides
  • Circulated hot air prevents high speed cooking and ensures even heating up of the entire oven cavity
  • Ideal for baking and making food crispier from inside as well as outside

Grill type:

Grill type microwave ovens are more focused on cooking foods like a conventional grilling, which browns food items, making them crispier from outside and juicer from inside. Many ovens feature grilling as a mode and this is ideal for making kebabs, tikkas and even parathas. Microwaves in grill mode can operate for a long period up to 99 minutes to prepare crunchy foods.
  • Works like a conventional griller using microwave radiation
  • A metal wire rack comes for this type of cooking
  • Browns food items to make them crispier from outside and juicer from inside
  • Features up to 99 minute long grilling time for preparation of a variety of food items
Oven (solo) type:

This type of microwave oven is the basic type that offers uniform heat distribution ideal for baking, reheating, cooking as well as defrosting food items. Solo ovens are sufficient for you if you don’t plan to use or combine grilling and convection modes in order to prepare lavish dishes.
  • Works like a basic oven using microwave radiation
  • Reheats and defrosts in seconds unlike conventional ovens
  • Offers uniform heat distribution, thanks to the turntable
  • Suitable for baking, reheating, cooking and defrosting food items
Countertop microwaves:

These types of microwave ovens are designed to be placed on your kitchen platform. You may choose to place it on the top of any other stable platform including other appliances. However, care must be taken to ensure free air circulation around this appliance.
  • Can be placed on your kitchen platform
  • Can be rearranged as per the space available in your kitchen
Over-the-range microwaves

You can integrate these types of microwave ovens in to a modular kitchen cabinetry or even with a compatible cooktop. Also referred as over-the-counter ovens, these will keep the stylish decor of your kitchen intact without looking like an add-on.
  • Integrated into modular kitchen cabinetry
  • Maintains the decor of your kitchen 
Microwave Oven Parts and Functions:

 
Microwave oven parts and components are usually those that make this popular household appliance work efficiently. The oven is a box like structure made of metal having a front opening built in which has a door. One side on the door has hinges and the other side includes a latch. Behind the see-through door is a mesh which helps in the representation of the microwaves. The construction of the latch within the device offers a few mini switches with regard to extra security. The unit shut down automatically if ever the door is unlatched. The door will stay close until the appliance will be run. The device cannot be run till the door is closed.
The inside of the microwave oven is named cavity. This microwave oven part is constructed of stainlesss steel. After the cable is plugged in and the switch is on, the microwave is able to use. The outside even offers the display and control panel to offer information for what must be accomplished. Right behind this particular control panel is a circuit board that operates this kind of product as well as helps make your instructions appear.
You will find there’s fan inside which sucks in air flow through vents located in the side as well as across the circuit board as soon as the oven is operational. This air is blown from your cooling fins of the magnetron. It then slides out of those cooling fins and also gets ducted past the light and enters the particular cavity by holes positioned in the cavity. Air allows in picking up moisture from the food preparation procedure taking place and guides it out of the oven through exterior vents in microwave oven.
You will find temperature receptors that can detect in case something is too very hot and the product will de-activate automatically if perhaps some thing is certainly bad. The control circuit provides power to the higher voltage transformer. Furthermore, it contains a capacitor and also big diode with its secondary section. This particular microwave oven part helps to secure the microwave oven form to be damaged.
The particular magnetron is one of the essential microwave oven parts and is the source of microwave generation inside the oven. It’s stimulated by using a relay procedure and the microwaves generated are led to the cooking food chamber via a little window.
THE microwave resistant turn table is positioned on to the floor of the cavity to provide rotation to the foods so your foodstuff is cooked equally. This specific turntable is operated with the help of a little knob like structure, that is linked by a belt to some low rpm motor.
The elements as well as circuits of a microwave oven are quite dissimilar to those contained in Televisions and other appliances. They present some complicated as well as exclusive difficulties with regard to technicians as well as technicians. They are usually unique and vary from company to brand name. In case there is any breakdown of microwave oven parts, it is best to obtain authentic spares fitted by just qualified personnel to get basic safety and longer life of the device.
How to use Microwave Oven:

Read the instructions and safety warnings thoroughly. There's a lot of stuff you need to know in that little booklet.
Plug your microwave in. Don't plug too many appliances in at once, or you may cause a power outage.
Set the time that you want to microwave something for.
  • If your microwave has a dial, turn it clockwise until the screen displays the desired time.
  • If your microwave has a number pad, type in the desired number of minutes followed by the desired number of seconds.
  • You may have to press "Cook" on your microwave before the time set will activate the microwave.
Apply your understanding to microwave specific items.

  • Start with Bake a Potato in the Microwave. If you are baking just one or two potatoes, or a sweet potato, reduce the power so the outside doesn't scorch by the time the inside is done.
  • Warm a plate of leftovers at low power.
  • Warm a milky coffee at medium power and check carefully when to stop so the milk retains its goodness.
  • Make s'mores in a microwave for a graphic demonstration of a microwave's power of cooking food through all at once: the marshmallow rapidly becomes extremely large.
  • Cook something big (but not huge, leave plenty of space on the sides, and stack loosely so some microwaves can enter into the core of the pile) at full power. For instance, a few pounds of potatoes to be mashed, piled all together plastic wrap or washed and returned to a plastic bag they came in, at full power. (Try fifteen minutes on high for five pounds.)
  • Microwave chopped-to-size vegetables before frying them to get the inside somewhat soft without having to burn the outside.
  • Make Microwave Popcorn, whether in a ready-made bag or in a covered bowl with a little oil (look around for a recipe). You might not expect from the rest of this article that it would work well, but it does. Follow the directions carefully; stop microwaving sooner rather than later -- it's better to have a mostly-full good bag rather than a full scorchy bag. This generally should be done on full power to make steam to pop the little kernels rather than slowly fizzling the moisture out of them. Try elevating the bag off the microwave floor for more even cooking if you get a lot of uncooked kernels alongside some burnt popcorn.
Understanding Your Microwave
Understand how a microwave oven heats food.

Microwaves penetrate and generate heat at depth within water-bearing food. In contrast, almost all other cooking methods heat the surface only, whether by conduction as in cooking with a fluid such as hot air (roasting), steam (steaming), oil (frying), or water (boiling), or non-penetrating radiation as in broiling. (Convection is merely bulk flow facilitating conduction).
  •  Microwaves do not cook from the "inside out", but do cook thin food essentially all throughout at once, and reduce the depth within thick food to which conduction from the rest of the food must carry heat.
  • Unlike boiling, etc. there is no hot dense fluid to carry heat to the interior of a large pile of food. Don't overstuff the microwave oven, even with somewhat loose items such as a big stack of potatoes.
A microwave generally cannot cook food that does not contain much water, including something that is light and fluffy, well.
  • Don't microwave something that contains little water for more than a minute or so before the microwave has a few minutes to rest, and put a cup of water in the microwave (which will get hot) with it to absorb the otherwise unused microwaves. This will help keep the microwave from overheating and damaging itself with surplus microwaves.
  • Generally, don't expect something that is supposed to dry out in the cooking process, such as a cake, to turn out well unless you use a special microwave-adapted recipe.
Microwaves tend to have many hot and cold spots from "standing waves". A turntable reduces this problem by moving the food through hot and cold spots. Very thin, flat solid food cannot conduct heat through itself rapidly to the cold spots. In some microwaves small or thin items cook better if they are supported above the floor by, for instance, an inverted bowl under a plate.
Understand how heat flows through food

A cooking method heats only the outside of a food item or in a microwave, the outer layers, perhaps an inch, enough to cook a two-inch-wide chunk more or less all at once. The heat must flow through the food to cook the rest.
In a microwave, heat must also flow from better-heated to worse-heated spots.
Water-based food most food, and the only kind that microwaves can cook cannot get hotter than 212 degrees Fahrenheit (100 degrees centigrade) until all of the water in the spot being heated has been boiled away. Applying more heat than sufficient to keep the outside from cooling below that point does not increase the rate at which heat flows into the interior to enable the cooking reactions (and to a very small extent, perhaps, be absorbed by them) by conduction through the watery bulk of the food. It only dries out the outside faster.
You may be familiar with this principle through cooking a steak. One should use high heat only to scorch the surface, then low heat to cook the interior to the desired level of overall doneness without ruining the exterior.
Pressure cookers keep water from boiling until it reaches a higher temperature, and, so, also cook extremely fast. But they are more or less limited to boiling (or, in the case of specialized commercial pressure-fryers for frying chicken, deep frying).
Sometimes it is desirable to cook the food at an even lower heat, to allow the interior to reach the desired temperature and sit at it for a certain period without the outside having to get much warmer. This takes longer because there is a smaller temperature gradient to drive heat flow, but, even with the longer cooking time, can keep the reactions that would overcook the outside at near-boiling temperatures to a minimum.
Consider sous vide. Try showing off with something "sous microwave", then seared, but start simple perhaps by poaching an egg in plastic wrap and be extra careful that anything involving raw meat or otherwise potentially hazardous is cooked through to a temperature sufficient to kill anything in it. Use a meat thermometer at several points. (There is little risk of something new bad developing in food during a microwaving process itself, because that is pretty fast.)
It is very important not to overheat something containing milk, such as hot chocolate, even to boiling because the milk can irreparably separate.
Watery foods, such as watery soups, can cook well at higher heat levels because they carry heat through themselves by convection. (Thick soups will not convect and will instead bubble locally and spit under excessive microwaving power.)
Consequently, turn down the power if microwaving just a few items of food so the outside and hot spots are not overdone by the time the rest is done. Generally, use half power if heating something other than at least a large mugful of watery liquid or a heap of food a few inches high at least; even less--"defrost" setting or one-quarter power for something already cooked and at risk of overcooking such as reheating chicken.
If you have been scorching the outside of items before cooking the inside, just reduce the power at first--you don't necessarily have to increase the cooking time. Remember, the overly-high heat wasn't cooking the food faster, just drying it out.

Understand the side-effects of other cooking methods, and choose to include them if you like.
  • Some cooking methods, such as frying, smoking, or boiling with salt or spices, also add material and thus flavor to the food. Microwaving doesn't add anything, so add all the flavoring (including "liquid smoke", smoke particles collected in a very efficient manner and dissolved in liquid) you like to the food before or after cooking. Add conservatively: only a very small fraction of the medium in which something would otherwise be cooked is actually absorbed into the food.
  • Some cooking methods add water to the food. Some, such as boiling (with water to be discarded) add way too much, so that it leaches out vitamins. Generally all that is needed with items prone to drying out is some plastic wrap with a few holes to prevent pressure buildup, but if something is on the edge of overdrying, add just a little water and cover it.
  • Some cooking methods dry out the outside of the food. Microwaving will liberate steam and re-moisten it, so if a crispy outside is desirable, generally microwave to get the inside mostly done, then cook the outside.
Honey varieties Types of Honey Honey from the flowers of Neem Honey 300 Types of honey

Thanks for Visiting www.womenspage.in
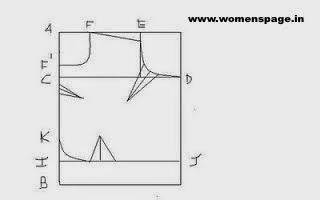
How to cut and stitch a blouse Step by Step in Hindi

 How to cut and stitch a blouse Step by Step in Hindi

Learn How to stitch Sari blouse By step by step the method to stitch a blouse is very easy.

The pattern is useful in stitching a cut blouse.
Lets use a readymade measurement to stitch the blouse (refer above diagram). I have used measurements in centimeter, You can do it with inch measurement.

* chest = 91 cm
* full length = 38 cm
* Across back = 35 cm
* sleeve length = 25 cm

FRONT PART

* A - B = full length = 38 cm
* A-C = arm hole = (chest/4)-4 = (91-4)/4 = 18.7 cm
* C-D = chest loose = (chest/4)+2.5 = (91/4)+2.5 = 25.2 cm
* A-I = front part = chest/3 = 91/3 = 30.3cm
* A-E = shoulder = AB/2 = 35/2 = 17.5 cm
* A-F = Neck Breadth = (chest/12)+1.5 = 9 cm
* A-H = Front Neck = chest/8 = 11.3 cm
* K-B = patti part = full length-front part=7.7 cm
PATTI PART (K-B part in the above diagram)

* A-C = full length = 11 cm
* A-B = patti width
SLEEVE PART

* A-B = sleeve length = (chest/4)+2.5
* A-C = sleeve width = (chest/4)+2.5
* E-D = (chest/4-4)Now let's see how to stitch the sari blouse. Before going to stitch the real material , we'll draw the stitching pattern. I have used chart paper to draw the stitching pattern. If u want to stitch a blouse of your size, take a sample blouse you already have and take the measurements using inch tape. It is nessesary to draw stitching patterns for both front and back side .

BACK PART PATTERN


The curve on the right is the arm hole while the other curve is neck.

FRONT PART PATTERN

First draw a pattern same as the back side then from the top measure 12 inch and draw a straight line. You can see a straight line drawn at a distance of 12 inch from the shoulder. The distance can vary from 12 to 13 inch based on the breast size . A normal women can draw a line at distance of 12" else 13".

Next measure 1/2 inch from the horizontal line and mark it. Likewise measure 1/2 inch above the horizontal line on both the extremes. Now as shown in the above diagram draw a neat curve along the points . I've drawn the curve in blue colour. Next step is to cut along the blue line like the one below. The image below shows the front and the back part pattern together.

Front part is cut into 2 parts. In the first part we have to sew darts then attach the patti part(2nd part) to the front piece.
In the above image i've drawn the darts . Those are the places where you have to sew darts.Now let's see how to sew darts using the cloth. Then take the material to stitch blouse. Below is the material i have used. Fold the cloth to the exact breadth size of the pattern once as shown in the figure . Then mark the edges with marking chalk. Next carefully cut the edges without disturbing them. Make sure the neck part is placed on the folded side.
                               After unfolding you can see both sides of the blouse.

Then 2 small darts have to stitched at the back part straight to the shoulders.

Then the main three darts have to be stitched carefully in the front part. Look at the stitching pattern diagram above for the three main darts. The dart stitched at the bottom should be bigger that the 2 darts at the left and right sides. Darts at the back part and front part are stitched.

Next to the front part , the patti part has to be stitched. After stitching the three main dots , the front part has to be stitched to the patti part. The patti part should have the remaining length so that it equals the back part.

Now the patti part is stitched to the main part. See to that both back and front parts are of same length. Then make sure you fold around the bottom line.


Next the front parts have to be joined to the back part. Just do that by stitching the shoulders correctly.

Next sleeve part is cut and attached to the arm. There are 2 options to stitch sleeve, you can join the sides then stitch the sleeve else you can stitch the sleeve and then join the sides. It depends on your comfort level. To cut the sleeve use ur model blouse for size. Just fold the cloth once and place the model sleeve on it, then draw the shape and cut it.

After the sleeve part is stitched, the neck crosspeice has to be stitched and then hooks have to be stitched. Finally we finish the complete blouse like thisTry yourself at home.


Nokia 225 feature phone specifications and features

Thanks for Visiting www.womenspage.in

Earthquake Safety Tips Earthquake Awareness

Earthquake Awareness Earthquake Safety Tips


An earthquake (also known as a quake, tremor or temblor) is the result of a sudden release of energy in the Earth's crust that creates seismic waves. The seismicity, seismism or seismic activity of an area refers to the frequency, type and size of earthquakes experienced over a period of time.

Earthquakes are measured using observations from seismometers. The moment magnitude is the most common scale on which earthquakes larger than approximately 5 are reported for the entire globe. The more numerous earthquakes smaller than magnitude 5 reported by national seismological observatories are measured mostly on the local magnitude scale, also referred to as the Richter scale. These two scales are numerically similar over their range of validity. Magnitude 3 or lower earthquakes are mostly almost imperceptible or weak and magnitude 7 and over potentially cause serious damage over larger areas, depending on their depth. The largest earthquakes in historic times have been of magnitude slightly over 9, although there is no limit to the possible magnitude. The most recent large earthquake of magnitude 9.0 or larger was a 9.0 magnitude earthquake in Japan in 2011 (as of March 2014), and it was the largest Japanese earthquake since records began. Intensity of shaking is measured on the modified Mercalli scale. The shallower an earthquake, the more damage to structures it causes, all else being equal.

At the Earth's surface, earthquakes manifest themselves by shaking and sometimes displacement of the ground. When the epicenter of a large earthquake is located offshore, the seabed may be displaced sufficiently to cause a tsunami. Earthquakes can also trigger landslides, and occasionally volcanic activity.

Safety Tips:
Have an earthquake readiness plan.
Consult a professional to learn how to make your home sturdier, such as bolting bookcases to wall studs, installing strong latches on cupboards, and strapping the water heater to wall studs.
Locate a place in each room of the house that you can go to in case of an earthquake. It should be a spot where nothing is likely to fall on you.
Keep a supply of canned food, an up-to-date first aid kit, 3 gallons (11.4 liters) of water per person, dust masks and goggles, and a working battery-operated radio and flashlights.
Know how to turn off your gas and water mains.

If Shaking Begins
Drop down; take cover under a desk or table and hold on.
Stay indoors until the shaking stops and you're sure it's safe to exit.
Stay away from bookcases or furniture that can fall on you.
Stay away from windows. In a high-rise building, expect the fire alarms and sprinklers to go off during a quake.
If you are in bed, hold on and stay there, protecting your head with a pillow.
If you are outdoors, find a clear spot away from buildings, trees, and power lines. Drop to the ground.
If you are in a car, slow down and drive to a clear place. Stay in the car until the shaking stops.

Doorways are no stronger than any other part of a structure so don’t rely on them for protection! During an earthquake, get under a sturdy piece of furniture and hold on. It will help shelter you from falling objects that could injure you during an earthquake.

Become aware of fire evacuation and earthquake safety plans for all of the buildings you occupy regularly.
Pick safe places in each room of your home, workplace and/or school. A safe place could be under a piece of furniture or against an interior wall away from windows, bookcases or tall furniture that could fall on you.
Practice “drop, cover and hold on” in each safe place. If you do not have sturdy furniture to hold on to, sit on the floor next to an interior wall and cover your head and neck with your arms.
Keep a flashlight and sturdy shoes by each person’s bed in case the earthquake strikes in the middle of the night.
Make sure your home is securely anchored to its foundation.
Bolt and brace water heaters and gas appliances to wall studs.
Bolt bookcases, china cabinets and other tall furniture to wall studs.
Hang heavy items, such as pictures and mirrors, away from beds, couches and anywhere people sleep or sit.
Brace overhead light fixtures.
Install strong latches or bolts on cabinets. Large or heavy items should be closest to the floor.
Learn how to shut off the gas valves in your home and keep a wrench handy for that purpose.
Learn about your area’s seismic building standards and land use codes before you begin new construction.
Keep and maintain an emergency supplies kit in an easy-to-access location.

If You Are Inside When the Shaking Starts:
Drop, cover and hold on. Move as little as possible.
If you are in bed, stay there, curl up and hold on. Protect your head with a pillow.
Stay away from windows to avoid being injured by shattered glass.
Stay indoors until the shaking stops and you are sure it is safe to exit. When it is, use stairs rather than the elevator in case there are aftershocks, power outages or other damage.
Be aware that fire alarms and sprinkler systems frequently go off in buildings during an earthquake, even if there is no fire.

If You Are Outside When the Shaking Starts:
Find a clear spot (away from buildings, power lines, trees, streetlights) and drop to the ground. Stay there until the shaking stops.
If you are in a vehicle, pull over to a clear location and stop. Avoid bridges, overpasses and power lines if possible. Stay inside with your seatbelt fastened until the shaking stops. Then, drive carefully, avoiding bridges and ramps that may have been damaged.
If a power line falls on your vehicle, do not get out. Wait for assistance.
If you are in a mountainous area or near unstable slopes or cliffs, be alert for falling rocks and other debris. Landslides are often triggered by earthquakes.

What to Do After an Earthquake:

After an earthquake, the disaster may continue. Expect and prepare for potential aftershocks, landslides or even a tsunami. Tsunamis are often generated by earthquakes.
Each time you feel an aftershock, drop, cover and hold on. Aftershocks frequently occur minutes, days, weeks and even months following an earthquake.
Check yourself for injuries and get First Aid, if necessary, before helping injured or trapped persons.
Put on long pants, a long-sleeved shirt, sturdy shoes and work gloves to protect against injury from broken objects.
Look quickly for damage in and around your home and get everyone out if your home is unsafe.
Listen to a portable, battery-operated or hand-crank radio for updated emergency information and instructions.
Check the telephones in your home or workplace to see if you can get a dial tone. Make brief calls to report life-threatening emergencies.
Look for and extinguish small fires. Fire is the most common hazard after an earthquake.
Clean up spilled medications, bleach, gasoline or other flammable liquids immediately.
Open closet and cabinet doors carefully as contents may have shifted.
Help people who require special assistance, such as infants, children and the elderly or disabled.
Watch out for fallen power lines or broken gas lines and stay out of damaged areas.
Keep animals under your direct control.
Stay out of damaged buildings.
If you were away from home, return only when authorities say it is safe to do so. Use extreme caution and examine walls, floors, doors, staircases and windows to check for damage.
Be careful when driving after an earthquake and anticipate traffic light outages.
Thanks for Visiting www.womenspage.in

Clove Apple uses clove apple for digestive problems To get rid of houseflies and fruit flies

Clove Apple can be used for different ways
For digestion:
A ripe apple is chosen and wiped clean.Now some healthy looking cloves are inserted into the apple.This can be very strenuous, so the apple can be pre-poked with a tooth pick at the places where the cloves should go.The cloves are removed after 7-9 days and stored in a dry jar.The apple is discarded.
Tucking a clove under the tongue once a day ensures excellent digesting power.This sets right most of the digestive problems.

Room freshener:
When the clove apple is left to dehydrate (Pomander)under the right conditions,it can last for years and it is useful for warding off flies and mask bad smells.
If you only have powdered cloves, you can use this method: Stab the apple a few times. Decorate it with clove powder and place on a small plate. Then, fill your teapot with cold water, put on "low," and put 3 tablespoons of powdered cloves in the water. Doubles as an air freshener.

To get rid of houseflies and fruit flies:
Take a sweet and ripe apple,and 20 to 30 cloves.Poke the cloves randomly into the apple.
Place the newly clove-decorated apple on a plate and place it in the middle of the table.Clove oil can be used when cleaning as another source of repelling houseflies indoors.
Whole cloves can also be wrapped in small squares of cheesecloth and tied up, then hung wherever the flies are entering the house or hovering, such as in doorways or windows.

Thanks for Visiting www.womenspage.in

Home Remedies for Vomiting Ayurvedic Tip for Vomiting

Home Remedies for Vomiting


Vomiting is a symptom of underlying disease and not a specific disease. It is an act of forcible of emptying the stomach contents. The stomach has to overcome the pressures that are normally in place to keep food and secretions within the stomach. During a vomiting episode, the stomach turns itself 'inside out' - forcing itself into the lower portion of the esophagus.

The signal to vomit can be stimulated by smells, taste, various illnesses and emotions (such as fear), pain, injury, food irritation, dizziness, motion, and other changes in the body:

Infections: This is often the cause, whether it is a common virus or an infection that is contracted from travel. May be associated with crampy upper abdominal pain, fever and chills. Common viral infections include rotavirus. Parasitic infections often are associated with diarrhea but may also have a component of nausea and vomiting. Bacteria such as H. Pylori can be the infectious agent.

Stomach flu: Is a non-specific term used to describe vomiting and diarrhea associated with a viral infection.

Food poisoning: May cause significant vomiting and usually is caused by a bacterial toxin. Symptoms begin within a couple hours of eating contaminated or poorly prepared food and may last for 1-2 days. Sources of food poisoning include Salmonella, Campylobacter, Shigella, E coli, Listeria, or Clostridium botulinum.

Other causes include:
Eating disorders (anorexia and bulimia)
Motion sickness (car sickness, seasickness)
Vertigo (the sensation that the room is spinning around)
Head injuries (such as a concussion or bleeding injury)
Gallbladder disease or appendicitis
Migraine
Brain tumors
Brain infections such as meningitis
Hydrocephalus (too much fluid in the brain)
Pyloric obstruction, a condition that causes forceful spitting up in infants)
Infection or irritation of the intestines
Low or high body chemicals and minerals as well as toxins in the body
Alcohol from beer, wine, and liquor which causes nausea and vomiting
Early pregnancy - morning sickness usually happens in the first few months

If the vomiting is so bad that the person cannot keep any liquids down for more than 8-10 hours.
Vomiting blood is a warning sign. Blood may be bright red or dark red. Sometimes old blood can look brown like coffee grounds.
If you are taking care of a child, see the doctor if the child does not pass urine in 6-8 hours (or has dry diapers for that period of time).
The patient shows signs and symptoms of severe loss of body fluids (dehydration) which include dry mouth and lips, less urine than normal, dark yellow and smelly urine, and severe thirst. Symptoms such as weakness, dizziness, lightheadedness are worse when standing.
Go to the Emergency Department if:
the patient is experiencing nausea or vomiting with severe stomach pains.
vomiting with fever especially in a child.
you see blood in the vomit.
vomiting does not stop and the patient is unable to keep down any fluids.
the patient has a known head injury.
there is other medical conditions present such as heart disease or diabetes.
you observe any signs of confusion or extreme weakness.
a new or severe headache is also present

Home Remedies :
Take medication as directed. Medicine usually involves those that help to decrease nausea and vomiting.
Avoid excessive motion, strong smells, and anxiety-producing situations.
Drink plenty of water, if the person can retain well, to prevent dehydration from fluid loss. Fluid intake helps correct electrolyte imbalance, which may stop vomiting:
Start with small amounts.
Only use clear liquids (such as clear soup, barley drink).
Avoid milk and any dairy products as they can make the nausea and vomiting worse.
Work your way up to soft foods such as porridge, oatmeal and go back to liquids if the nausea and vomiting return.
If the person cannot retain fluid, gives small amounts. Provides ice chips repeatedly.
After 24 hours of fluid diet without vomiting, begin a soft-bland solid diet such as the porridge, bananas, toast, noodles and potatoes.
Children should be given oral rehydration solutions such as Pedialyte. Fruit juice and sports drinks will not correctly replace fluid or electrolytes lost from vomiting. Using plain water will not replace electrolytes and may dilute electrolytes to the point of seizures.

Ayurvedic Tip for Vomiting:Eating a pinch of Ajwain powder and a pinch of clove powder which is mixed with honey helps people who are suffering from this problem.

Home remedies for vomiting sensation during pregnancy:

Honey varieties Types of Honey Honey from the flowers of Neem Honey 300 Types of honey

Thanks for Visiting www.womenspage.in

An ayurvedic cure for Thyroid problems

An ayurvedic cure for Thyroid problems

Mix
Triphala powder-300gm
Deodar stem powder-100gm
Long pepper powder-100gm
5 gm of this powder is taken twice a day with honey for the Thyroid gland to start functioning normally.
Note:The powder must be very fine.

An oil massage for Thyroid problems

Massaging a little mustard oil on the neck will strengthen the thyroid glands and decreases all kinds of thyroid problems.This is an aid and not a cure.

Nose drops for Thyroid hormone disorders
The Neem oil is extracted from the seeds to have many medicinal properties.
Using them as nose drops regulates the functioning of the Thyroid gland .
Dosage-1 drop in each nostril-preferably early in the morning on an empty stomach 

Neem tree is an important source of medicine, livestock fodder and food. A special type of food for diabetics is prepared from the gum obtained from the bark of the Neem tree.

Neem tree has medicinal, cosmetic, pesticidial, environmental, culinary uses and the young neem trees act as livestock fodder.
Thanks for Visiting www.womenspage.in

How to make pooja thali at home decorative aarti thali how to make puja thali at home Diwali Thali Making

How to make pooja thali at home


Decorative aarti thali these aarti thali also know as pooja thali , puja thali , wedding thali , decorative thali , decoration thali , wedding phokhana thali , navratari thali , decorative metal thali , aarti thal , pooja thal , puja thal , owernachi thali , hawan pooja thal , aarti thali.

Decoration of a Puja Thali
Take a thali made of any metal such as copper, steel, gold, silver or brass,of any shape and with less designs as it need to decorate much.
Put a colourful designer packing paper sheet or cloth on the plate and keep all the puja imple ments on the plate.Otherwise,spread ghee or butter on the plate and put some roli small bowl and mix a little bit of water to produce a paste.Now with this roli paste draw the holy symbols like the 'Om', the 'Swastika' and the 'Shree' on the plate or the thali.
To change the look of the thali or the plate into a green look then use the betel leaves put it on the thali or plate.The colourful puja implements when put into the green thali or plate it will have amarvelous look.
Put petals of different flowers such as rose, marigold or any other,of different colours and decorate it on the thalis or plate.
The decoration of the thale or plate can be done by the use of different type of rangoli colors and putting diyas on it.
The decoration of the thale or plate can also be done with rice grains and Kumkum and put some flowers on with the diyas .
The thali or plate can also be decorated with water paint by drawing different types of symbols such as Om and Swastika.Without drawing on the thali or plte paste designers stickers on it.

There are many more implements used in decorating an integral
part of a traditional Hindu Puja Thali :
Bells (Ghanta/Ghanti)
Betel Leaf (Paan)
Betel Nut (Supari)
Camphor (Kapur/Kapoor)
Coconut (Nariyal)
Desi Ghee/Clarified Oil
Havan Samagri
Honey (Madhu)
Kumkum (Roli/Sindoor)
Lamps/Diyas (Diyas)
Panchagavya
Other Puja Thali Items
Other Implements of Puja Thali
Akshat or Rice Grains :The unbroken rice grains are Known as Akshat.It is also prefer to the brain's steadfastness and firmness.It is also the symbol of peace. It is given at the foot of the deities by uttering the mantras to gain wealth and prosperity. The mantra is:"Akshtaashcha Surshreshtth Kumkumaaktaah Sushobhitaah. Mayaa Niveditaa Bhaktyaa Grihaann Parameshwar."

Hand Spun Flower:Hand Spun Flower are beautiful hand-woven garlands made of flowers and fibres such as wool,cotton,etc. are the important implements use to decorate the idols of any God or Goddess which is regularly follwed.
Panchpatra & Pali (Charanamrit Set):Panchpatra & Pali set is made of brass and it is an important part of puja.In it the the holy charan amrit is put infront the deity at the starting of the puja and it distributed among the people totally.The meaning of Charanamitra, Amrit (Holy Nectar) from the Charan (Feet of the Lord) of the God worshipped and it is the sacred gift at end of the puja.
Niranjan:It is an important part of any rituals or puja.It is a decorative wick-lamp holder in which five wicks are kept in oil or ghee.
Cotton:It is used to make cotton wicks at time of kindling the lamp in any festival Puja.At the time of ritualistic "Abhishek" or "Snana" of the deity is made, a packet of cotton is given or used as a symbol of clothing.
Sacred Red:It is a red cotton thread and it is an important accessories of the puja.Mouli or Kalawa is a roll of red cotton thread which is very sacred and used in Hindu rituals.It is bind around the Sadhana accessories,that is it is bind around the copper tumbler filled with water.On its mouth five mango leaves are kept with a coconut and a red cloth on them and this i known as "Kalash Sthapana".The red sacred thread is bind around the wrist of the members of one's family,before starting the Puja.All married men and women wear it on their right hand and the others wear it on their left hand.Only in the case of Brahmin females the above rules of wearing the thread is not applicable.The thread is weared to signify of getting God's blessings.

Abir:It is an important implement of the Puja.It is Mainly used put a mark that is to put "tilak" on the forehead of the deity and also used to decorate.
Haldi:Haldi or Turmeric is used For puting "tilak" on the forehead of the deity.It also used to decorate.
Janeu or Janou:It is the most important integral of the Hindu culture,which is to wear the sacred white thread.It is compulsory and very important to wear the sacred thread while performing any Puja.Upanayan Sanskar is held at the time when an unmarried boy the Janeu is granted and after this one can perticipate in in any Vedic ritual.
Dry Fruits:Different type of dry fruits are used in Puja thali,it consists of almonds, cashews, walnuts, kismis & pista.

puja thali are used in ganesh uttsav for doing pooja of lord shree ganesh , ganesh aarti thalis which  are used for pooja archana of lord shree ganesh.

Puja Thali Decoration:


Diwali THALI MAKING

Diwali is the puja of Lights,Crackers and sweets.On this day Lord Laxmi(Goddess of Wealth) and Lord Ganapati(the Lord of Wisdom) is worshipped,to get wisdom and prosperity in the life of people.Diwali is a big puja where one's hole family sits and prays together to the deities with various important materials like like flowers, sandalwood, kumkum, aroma sticks, diya and panchamrits.


Navratri Aarti Thali Decoration

On the occasion of Navratri, the aarti thali is considered to be an important item to perform a puja. The aarti thali which consists of decorative puja items look pretty when placed on the puja table. There are certain essential things which needs to be placed on the Navratri aarti thali in order to make it look beautiful and attractive. The thali plate consists of lamps, kumkum and of course an idol looks very authentic when placed on a beautiful plate. There are different types of plates available in the Market which you can make use of. However, the steel plates are commonly used. But, today, copper thalis are becoming a hit! Copper thali are much better to use for Navratri because it is lighter in weight, and thus makes it easier to perform the puja too.
Gold Rate Today
Silver Rate Today


Thanks for Visiting www.womenspage.in

How to Remove Curry Stains How to Keep Whites White Removing curry Stains

 How to Keep Whites White


Separate your white clothes and fabrics from your dark clothes before doing the laundry. Washing white and dark clothes, towels, sheets, etc., together can result in color transfer. Even if the color doesn't change, white items can appear dingier after coming into contact with darker colors. White clothes or fabrics also tend to pick up dark fluff and look unclean.

Separate by fabric type. Fabric types need to be taken into consideration when creating separate washing piles. Even whites need to be further separated as follows:
  • Acetates and acrylics wash together
  • Linen and cotton wash together
  • Wool washes alone
  • Delicates should be washed by hand.
Pre-treat any stains. Pre-treating stains on clothes or other fabric items before you wash them will ensure that the stain is removed and isn't "set" by the washing process. There are several pre-treating agents on the market, including enzyme detergents and oxygen bleach. But if you want to remove stains using a common household item, reach for dish washing liquid or clear shampoo and apply it directly to the stain.
  • You can even use a bit of your normal liquid laundry detergent. Scrub the stain away using a new toothbrush.
  • Always read the garment label before adding any stain remover.
Soak the stained garments in hot water after pre-treatment. This can help loosen up the components of the stain.

If, after a wash, the stain remains, go through the pre-treatment process againbefore drying your clothes. Drying clothes with stains on them can make stains next-to-impossible to remove.

Wash white clothes in hot water. Provided the fabric can handle hot water, this is the best setting for white clothes.

Use enough soap or detergent to wash dirt away.

Add a whitener or brightener to brighten the whites. You can use proprietary whiteners, or use your own from these suggestions: lemon juice; white, distilled vinegar; or, 3-percent hydrogen peroxide.
  • Pouring 1/2 cup of lemon juice or 1 cup of white, distilled vinegar or 3-percent hydrogen peroxide into your washing machine with your clothes can keep your white clothes white.
  • If you use lemon juice, dry your clothes under sunlight, as ultraviolet rays can also help brighten whites.
Consider adding a laundry booster to your wash. Adding washing soda, oxygen bleach or borax will increase the efficacy of your detergent. These boosters work best with soft water.

Use a color remover on your white clothes if they discolor, become dull or look dingy.
  • Color removers can remove the unwanted colors from whites. If you don't want to purchase a color remover, mix boiling water with oxygen bleach and let the clothes soak in the mixture for the same effect.
  • If colors bleed during the wash, do not allow the garments or items to dry. Add color removers to the wash and do the whole wash again. Once the wash has dried, the color transfer tends to set.
Make sure that clothes are completely rinsed. This removes all traces of dirt or grimy water that can dull the look of whites.
  • Select an appropriate load size. The clothes or other items should be able to move freely around in the water.
  • Clean your washing machine regularly to ensure that your white clothes are actually being cleaned and that any remaining dirt in the washing machine isn't being transferred onto them.
Add bleach to your clothes as a last resort. Bleach will keep clothes white and can act as a disinfectant. Make sure to use the appropriate amount of bleach as recommended on the packaging or else you may damage your clothes.
  • Be aware that bleach has been linked to numerous health problems.
Dealing with Yellowed White Fabric

Wash and rinse the fabric or garment as usual.Rinse the fabric in a little vinegar and water.Hang in the bright sunlight to dry.

Adding water softener to your laundry cycle might improve the appearance of white clothes. Using hard water to wash white clothes can result in mineral transfer and deposits getting onto your clothes. A 1/2 cup of white, distilled vinegar can act as a natural water softener.For best results, pre-treat a stain as soon as it presents.

How to Remove Curry Stains

Hold the stain under running water. This water must be lukewarm, namely not too hot and not too cold. Keep the stain there until the water runs clear and no more of the stain appears to be coming out.

Create a mixture of glycerine and warm water. Make up this mixture of half glycerine and half warm water. Rub this mixture into the stain. Leave for 10 - 30 minutes. Rinse out.

Soak in biological detergent. This is a detergent used for washing clothing that contains enzymes.Wash as normal.Hang out to dry. Dry in your usual fashion.

Really stubborn curry stains can be treated using one part of hydrogen peroxide to six parts water. Only do this if the fabric is suitable however; this is serious bleach and will also weaken fabric threads.

The main part of the stain is probably caused by the turmeric. Turmeric is actually also used as a dye, but it isn't 'fast' in sunlight.

Therefore, spot treat the stain,wash the garment, hang it out, and - eventually - it should fade. This will almost certainly need to be done more than once, though.

The main spice which is staining your clothes is mainly turmeric. Some of the curry powder stain could also be coming from cayenne pepper powder. You could applying Shout It Out by pre-treating it for 30 minutes. That sometimes works. You could also try washing it in Oxy-Clean (must be very fresh and brand new for maximum potency).

Mix one tablespoon of liquid hand dishwashing detergent and one tablespoon of white vinegar with two cups of warm water.

Using a clean white cloth, sponge the stain with the detergent/vinegar solution. Blot frequently with a dry cloth until the stain disappears.

Sponge with plain water; blot until the liquid is absorbed.

Sponge the stain with rubbing alcohol; blot to remove the stain.

Sponge with water; blot until the liquid is absorbed.

If the stain remains, mix one teaspoon of liquid hand dishwashing detergent and one tablespoon of ammonia with two cups of warm water.

Sponge the stain with the detergent/ammonia solution. Leave it on the stain for at least 30 minutes, blotting every five minutes with a clean white cloth and more solution.

Sponge with cold water and blot dry.
Get as much of the curry out as you can with water, while fresh, then let dishwashing liquid sit on the remaining stain for 15-30 minutes.if there is anything left, use white vinegar on it,repeat the dishwashing liquid and vinegar if necessary, until stain is completely gone, launder as usual.

Thanks for Visiting www.womenspage.in

 
Design by Free Interview Questions | Bloggerized by Lasantha - Premium Blogger Themes | Press Release Distribution